

Hello all. Today, I offer you written feedback, in addition to my last video on the YouTube channel following the purchase of several Jobeky cymbals for my set up.

I found my 18" ride and my 14" jobeky hi-hat so pathetic (second degree)...that...
- despite the 8 week wait on my previous one starts ride/hh,
- despite the difficulties in communicating with the brand, - despite the transmission of erroneous information by the admin of their Facebook group concerning anti-spin.
...I still signed up for 2 crash 14" 2 zones in finishes: vintage hybrid.
This time, the support for this command was completely different. I had also resigned myself to waiting, 8 weeks like the previous time if necessary, since this time I had no emergency linked to the resale of my previous equipment which had left me without wrinkles, nor hi -hat for several weeks, which also disrupted my video shooting schedule. (hence my current annoyance).
I've never been tough about expressing my opinion when things go wrong or when the material sucks.
I also know how to express myself with just as much energy when things are going well, seeing very well and the material is good.
I won't go over the communication problems I encountered with this brand for my previous order, since this time, I didn't need to contact them 10 times in 8 weeks, to finally get answers to them. of a delivery time.
I will still come back at the end of the post, on the anti-spin problem for their solid cymbals, in order to give a more complete feedback, after several months of playing on the 10" splash, the 18" ride and the 2-piece HH 14". The famous anti-spin mentioned...

This time,...
My order was manufactured in just 2 weeks (that changes everything, 2 months for the previous order) and delivered in 4 days, 4 days in advance of the date indicated by DHL. Gorgeous....!
These 2 crashes, which work wonderfully well, replace 2 of my DIY crashes (+/- similar in appearance), but with the advantage of offering 2 zones instead of just one and above all... an edge zone shockable thanks to a 180° membrane, which I missed on my DIYs. (at least for these 2 crashes). Photo before change of the 2 crashes. I will take new photos soon.

This type of shockable membranes mentioned is not as simple as it seems to install for a SOLID and DURABLE DIY installation on solid cymbals, it also takes a long time to obtain (1 to 2 months and to order in the United States from goedrum for example).
It is sold as a kit and it is above all very expensive for what it is, which brings your DIY cymbal, once you take into account the purchase of acoustic cymbals, the 2 or 3 zone DIY kit with membrane, the internal insulation + the rim noise eliminator (+ the time spent which I don't even take into account), at a higher price than if you buy them ready-made from Jobeky and without certainty that it works as well.

So I made up my mind, guided by the reality of the manufacturing cost. My 2 and 3 shockable zones are therefore ALL Jobeky. Even if I keep my splash and Home made chinas in 1 zone trigged at 360°, which do the job very well. However, I let go of the initial idea, to create my 2 shockable crash zones with membranes myself, by improving those that I had already created.
Some detailed photos of my home made 1 zone and some components used.


__________________________________________________________________
FEEDBACK AND SPECIFIC TIPS RELATED TO ANTI SPINS:
__________________________________________________________________
To return to the anti-spin system offered by Jobeky on this type of cymbals.
If you also want to opt for this type of cymbals, you should definitely not do what was recommended to me by the administrator of the Jobeky Facebook group. That is to say, when ordering on their site, ask to have (for an additional 15 euros) the anti-spin products that they offer for their low volumes. You will most likely, like me, be disappointed by the result obtained, even if these anti spin products certainly work very well on their low volume models.

I tested on their solid cymbals and also on my home made ones, which are made +/- in the same way, but with cymbals of different shapes and with "simplified" triggering, having purchased these anti spin separately ( after ordering the cymbals).
Their anti-spin can in fact be physically adapted to their solid cymbals, by drilling the technical cymbal (i.e. the one below) in order to obtain invisible holes on the playable cymbal above. Photo of a low volume Jobeky trigged and with their anti spin installed .

Where this becomes problematic is that on their solid cymbals, which are ultimately "sandwiches" of sensors and insulator, whose "slices" are 2 cymbals superimposed and locked together, using a plumbing connection. The addition of anti-spin, which is basically designed to lock rotation and ensure swinging on a single-thickness cymbal, makes swinging on a double-thickness cymbal with a tubular connection extremely limited.
This tubular plumbing connection, approximately 12 mm long, threaded, with nut + counter nut, limits (by its length and its small internal diameter) the swing on the cymbal boom. If we add their anti spin with a "W" shape and an inverted "V" Roland type cymbal support, the result is clear, the swing becomes almost zero, because there are too many elements which disrupt, constrain, limit this swing. Photo of the famous plumbing connection allowing the 2 solid cymbals to be locked together, so that you understand better that it is not only the cymbal which swings against the axis of the pole, but this part .

So... ok, if we judge by the basic function of an anti spin, in fact, it no longer rotates, on the other hand... there is, as one might say, "a fly in the kebab".. .A cymbal with almost no swing at all is unacceptable for me.
If I opted for electronic metal cymbals, it is not ONLY for the "look", but also for the realism of the playing sensations and as much for the realism of the sticks' touch, as for the realism of the swing ( Of course). I buy cymbals, not trigged pans.
The solution is ultimately very simple and inexpensive to resolve this problem. You simply add NOTHING AT ALL.
For my part, I simply removed the anti spin that I had installed.
The weight of the double cymbal from 14" + the weight of the jack connector housing (which acts as a slight counterweight), is (almost) enough to prevent rotations, since the cymbals are placed with a slight inclination towards the drummer. The cymbal therefore returns (more or less) to its initial positioning by itself.
It's quite rare that I have to put the 14" crash cymbals back in place finally and on the ride, I never have to do it, given the weight of this 18" double thickness.

Concerning the hi-hat, no need for anti-spin on this element, since the tightening of the tilter on the stem of the hi-hat foot prevents the rotation of the playable cymbal, therefore: NEXT...since the shockable zone at 180°, remains always in a good place in front of me.
Charley Jobeky 14" customized by me, with replacement of the original top cymbal, with a b20 bronze cymbal with patinated appearance + Istanbul flocking.

LESS GOOD...: Concerning the Jobeky 10" splash,...we are faced with a problem which deserves a little attention and which deserves an improvement by the manufacturer.

I bought one, before buying my Hi-hat and my ride. It is also the latter which allowed me to test the quality of playability of these cymbals, before considering more substantial purchases for my change of cymbals. Fortunately, I did not limit myself to this first impression and that I took into account the options 2 and 3 zones + shockable surface for the larger models, because these 10" are beautiful and playable, but still feature in my opinion some "misses". They are in a single zone, small therefore light, placed almost flat (compared to crashes, wrinkles, chinas) and tend to rotate a lot during the game. In addition, (which does not doesn't help anything), they only have one piezo sensor between the 2 cymbals, which after testing is not enough to obtain perfect 360° triggering on the surface opposite the positioning of the piezo. much too weak capture, sometimes even no triggering, even after having pushed the sensitivity to the maximum on the module and of course, after having tested with all the cymbal presets offered on an ATV ad5 module, which is nevertheless a relatively complete module and completely correct for managing non-ATV elements (same result with an ATV xd3 by the way).
10" Jobeky cymbal = second splash from the left, the first being a DIY of my own making .

TIP (if we can describe this intervention in this way, which is in reality a modification): Knowing that I could not install an anti-spin (in view of the mediocre result for the swing) and that I did not particularly want to having to reposition this splash every 10 hits... I solved the problem definitively by opening the cymbal and its connection box, taking out the soldering iron and redoing the triggering of this cymbal, by tripling the piezos encapsulated between the cymbals and arranging them with regular spaces. 2 piezo face to face, (so that each sensor can cover +/- half a cymbal), would have been sufficient, given the small format of a 10", but even if it means redoing,... I have went all out and planned more than necessary, (whether it's 2 or 3 or 4... piezos in series, it's not more complicated to do). it will trigger every time anyway". Below, an example of how I replaced my piezos on the 10" splash, here as an example, my home made 16" china ozone, currently being prepared ( during the phase allowing isolation between the technical cymbal below and the playable cymbal above) . I also proceeded with this arrangement, for all my home made cymbals in a single zone.

___________________________________________________________________________________ ( Little parenthesis of thinking out loud: It's a VERY special improvement "tip" and even frankly hard to digest, when it's new equipment, which has just been purchased and has been purchased so as not to have to do it yourself, especially since not everyone necessarily feels capable of such a modification. Not everyone is equipped with a soldering iron and a soldering iron. a stock of piezo sensors, however inexpensive it may be). Which explains my remark concerning an improvement which should be considered by the manufacturer. An additional piezo added to the splashes would only cost 30 cents more during the design and would improve 360° capture and resolve the problem linked to anti spins on these splashes. ___________________________________________________________________________________
In this photo, you can see these 2 new 14" 2-zone crash and shockable devices in good places.

For the 14" crash, the 14" hi-hat as well as the 18" ride, it's the same, that is to say that to cover the entire playable surface of the flat of the cymbal, there is only a single piezo as well (plus the piezos and membranes, allowing you to play in 2 or 3 zones on shockable cymbals). This piezo (cymbal plate) is placed +/- in alignment with the jack connection box and therefore. facing you when you play and for the reasons mentioned earlier (weight of the cymbal, slight inclination of the cymbal and weight of the case which serves as a "small counterweight") the presence of a single piezo is not very disturbing, since the cymbal does not spend its time rotating, unlike splashes. The semi-circular playable surface of the flat is therefore amply sufficient for the 18" ride, the additional piezo located under the bell, allows excellent capture over the entire bell. 360° without any worries. Another view, which will now be offered in camera 4, during video filming for the Kraken Addiction YouTube channel.

ANOTHER ADDITIONAL TIP, TO COMPENSATE FOR THE ABSENCE OF ANTI SPIN: Adding a small strip of scratch (on all my cymbals) to lock the jack cable on the pole (just under the cymbal), finished adjusting the issue. So I no longer have any problems related to the absence of anti-spin.
Be sure to leave a small loop of slack on the jack, between the connector box and the boom, to avoid any tension on the jack socket or on the box. You should not completely block the rotation, but just limit it, so that the cymbal cannot rotate too much on itself and return to its place on its own, gently, thanks to the counterweight of the jack box, to the slight inclination of the cymbal and with the small scratch which will help with the return of placement.
If you lock the rotation too much (without leaving a loop of slack on the cable), you risk damaging either your jack or the housing connectors, see both.
The 4 views from the 4 cameras for the videos on the Youtube channel.

___________________________________________________________________________________
VERDICT & CONCLUSION
___________________________________________________________________________________
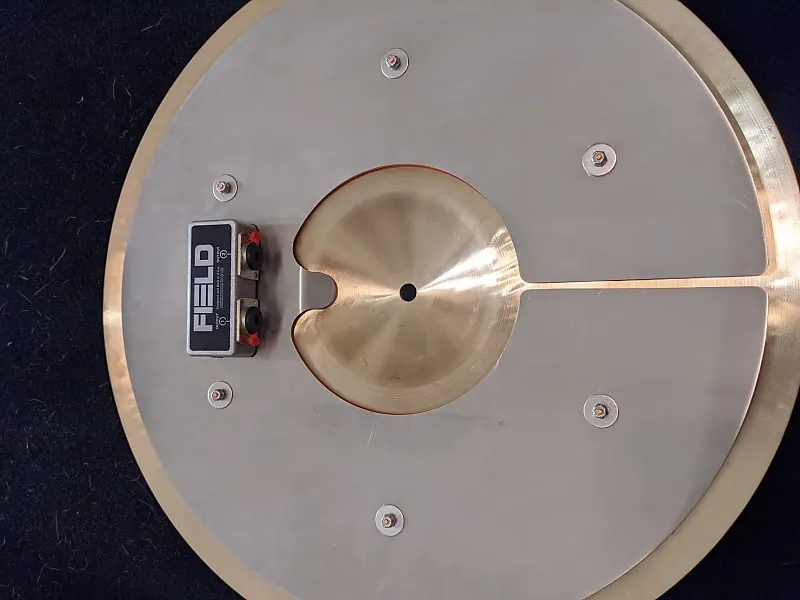
I think you will have understood, if I bought 2 Jobeky crashes to perfect my new set up of cymbals, it is because despite certain (justified) remarks, I am nevertheless extremely satisfied with this type of cymbals, but also by the quality and the quality/price ratio offered by this English brand. (Apart from the capture on the splash which deserves the small improvement mentioned). There are few similar alternatives for electronic cymbals with solid metal surfaces, such as field cymbals, which are absolutely magnificent cymbals with aerospace-worthy finishes, but also very expensive (2 to 3 times more expensive than Jobeky). Field cymbals:


or the new DWe cymbals (the unattractive demarcation of the bells bothers me) and which are also not cheap. Not to mention certain uncertainties, concerning this new wireless pickup system on these cymbals, which is causing a bit of debate among drummers, who fear having to rely on batteries embedded on the elements to ensure the module connection and who can drop you right in the middle. concert, or even undetected shots according to certain returns. DW Cymbals:

This neat acoustic look and this very realistic playability on solid metal cymbals definitely convinced me, and honestly,... it would be VERY difficult for me to go back to the classic electronic cymbal, made of plastic and covered with rubber or silicone , unless forced to do so by obligations linked to the neighborhood of course. However, I have had many, of all sizes and brands, from the cheapest to the most expensive. (fazley, triggera, millenium, lemon, roland, atv).


My 10-piece ATV cymbal set was so good...that I had a hard time deciding to take the plunge, as they were fantastic to play, even oversized for my needs, with for example the possibility of playing in 3 zones, even on a 10" splash.

However, I have absolutely no regrets. Quite the contrary! Finding extremely realistic playing sensations, solid metal under the olives, on an electronic drum is really the little extra thing that changes everything. As much for the realism of the rebound of the sticks, as for the aesthetic aspect elsewhere.
Unfortunately, this type of cymbals, as I indicated at the end of the video when I presented my new cymbal set up, (see video below) is noisier in terms of ambient sound when hitting the sticks than when hitting the drumsticks. “classic” electronic cymbals.
This is a REAL technical constraint, which must be taken into account, if we play in a context where, above all, we must preserve good neighborly relations in an apartment.
It should also be noted (even if it seems a detail), that your use of drumsticks will resume a rhythm similar to that of playing on acoustic drums. So you can forget about pairs of chopsticks that last 6 months.
Apart from these 2 disadvantages, I only find advantages in this type of cymbals: Technically: - Electronic cymbals with solid and trigged metal surfaces, whatever the brand chosen, including if you are making home made, this is not the case. It's pure joy++ in terms of gameplay. The realism of the rebounds cannot be compared with the "trampoline effect" of classic electronic cymbals, even ultra-high quality ones. - They also allow increased sensitivity of the capture. Metal being a much harder material than plastic covered with rubber, it makes it easier to capture piezos. For my part, I lowered the pickup sensitivity of all my cymbals on the modules, knowing that previously, I played on ATV cymbals, which already offered very high-end pickup quality and finesse. - These cymbals are extremely durable, due to their materials. (bronze b20 in my case), which is also double thickness, with light damping by a rim noise eliminator between the 2 cymbals, therefore, not "impossible", but very difficult to split, unless you are a lumberjack on steroids anabolics and playing with baseball bats.
The 2 cymbals being fixed together, by a piece of plumbing, it is also impossible to create a key hole, since it is the piece of plumbing, which ensures the contact on the pole and not directly the cymbal.

- This durability of the material is accentuated by the possibilities of easy dismantling and repairs. Simply unscrew the lock nut of the plumbing connection to access the heart of the cymbal, to change the piezo, or to make possible soldering repairs (and other modifications) in the jack connector housing. Everything is replaceable or repairable in the event of a problem, without having to resort to after-sales service as long as you are at least handy.
It would also be simple to change the top cymbal in the event of a crack, since I learned to do it for DIY and there is nothing rocket science in widening a hole in a cymbal purchased wherever you wish. and with the finishes you want with a storey forest.
I also did it automatically upon receipt, on my HH Jobeky, to obtain an HH with a top cymbal which has a little more aesthetic appeal, than the original top that I had taken into account. "basic" version. Aesthetically (secondary, but still important) : - As long as you have a module or a VST that allows you to play realistic and qualitative sounds and that you take care to make a beautiful cable management, whether it is for your pleasure personal at home, or to obtain a beautiful aesthetic presence on stage, your electro drums instantly take on an acoustic appearance, while allowing you to retain the advantages of electronics.


That will be all for this return. Thanks for reading to the end, there was quite a bit to say. Do not hesitate if you have questions on points that I did not think to address, to ask your little like and/or to leave a comment, if you found this article useful or interesting. See you soon. There are a lot of things to come, especially on the Kraken Addiction Youtube channel. ... to be continued. Hello hitters.
Comments